All Posts By

Bloom Beautifully Self-care box
Featured Mompreneur small business spotlight

small business spotlight: bloom beautifully box

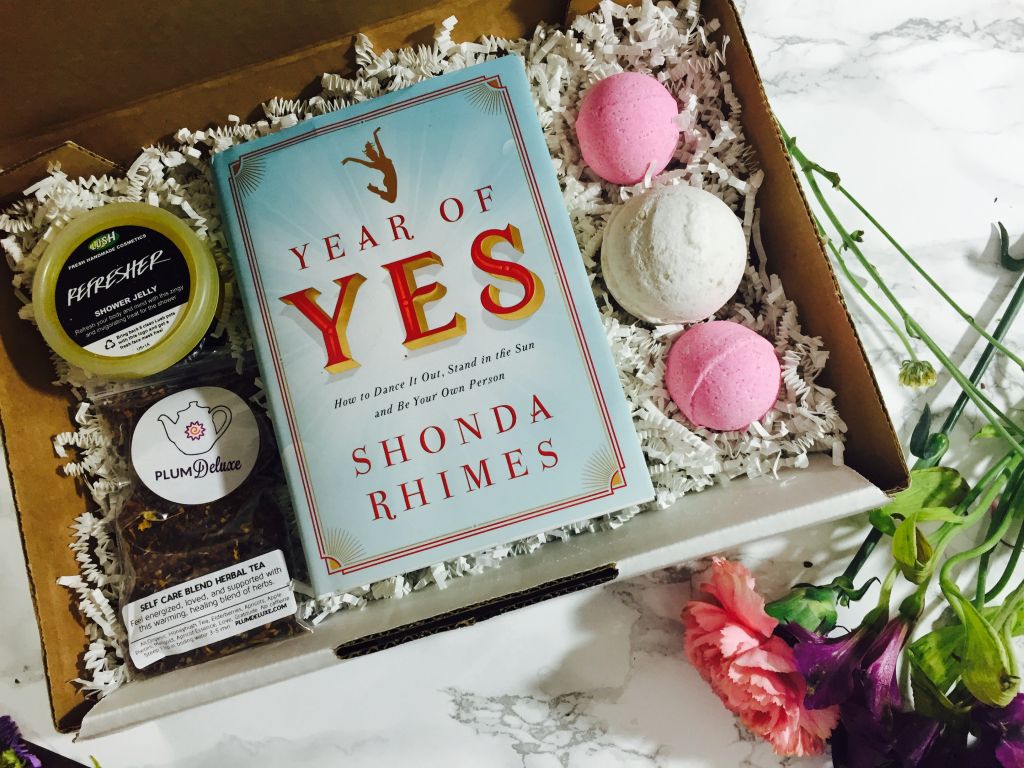
Bloom Beautifully is a bimonthly self care subscription box service for busy women. I was happy to connect with Tara Jefferson, the founder and chief curator of the Bloom Beautifully self care box to ask her a few questions on how she manages everything and what was her inspiration behind creating a self care box for women.

Being a wife, mother and entrepreneur it doesn’t take a genius to know that juggling all three requires a lot of hard work. For the woman that is looking to jump into the arena of business ownership, what is the one thing you would like her to know about the rewards and challenges that come with walking in entrepreneurship while running a family?

JeffersonTara21 web(1)Being an entrepreneur is all-consuming, and so is motherhood. So I’ve found that the only way to make it work is to bring my children into the discussion. They are old enough now (9 and 7) to serve as my “creative team,” and they give me feedback on designs, vendors and pricing. When they were younger, I found it easier to work with them on my lap than to have my brain half focused on work and half focused on what they were doing in the other room. The beauty of entrepreneurship is that it doesn’t have to look one way. You can shape it to work best for you and your family.

Your self-care box is not your first wildly successful business venture. Looking at your track record you are one remarkable and astute business woman who has created businesses, products and conferences that center on uplifting and encouraging young mothers and women. Why not just stop there, what was your thinking about expanding into something as important and overlooked as self-care

I didn’t realize as I was doing all those other things (the self-care retreats, the conferences, the books) that everything I was dabbling in was bringing me to that moment. It’s one thing to attend a retreat once a year and focus on your self-care for a weekend, but it’s another thing to have something that comes to your house and rewards you for just being you. Women tend to be invisible to themselves, putting everyone and everything ahead of them, while their core self withers. I wanted something for women that would make their self-care habit-forming. Thus, the Bloom Beautifully box!

I’m just going to ask the infamous question that I think every woman who dares to be an entrepreneur has heard at some point. “How do you do it all?”

I have a very, very full plate, so I’ve learned to take small bites and not chew too fast. That means I don’t worry as much about tomorrow and instead try to focus solely on today. I make sure my to-do list stays manageable, no more than four things at a time and I rely on my calendar exclusively. If it’s not on my calendar, it doesn’t get done. I also make it a point to be available to my kids. If they ask me to play with them and I’m knee deep in work, I take a deep breath, push away from the computer and go play. I’ve found that those breaks with my children actually make me sharper, creatively and it’s a joy to be there, watching them grow.

A huge thank you to Tara for sharing her experiences and words of wisdom. I hope it encourages you to go after that dream or take a moment to yourself.

To learn more about and order the Bloom Beautifully Box visit the website at www.TheSelfCareBox.com

Tara Pringle Jefferson is the founder and chief curator of Bloom Beautifully, a bimonthly self-care subscription box for busy women. She is also the writer behind TheRenaissanceSuite.com and TheYoungMommyLife.com. Her work has appeared in Jet, Essence, What to Expect and Sirius XM. She lives in Ohio with her husband and two children. Find more information about the box at www.theselfcarebox.com and follow her on Instagram at @TaraJefferson


DIY Featured Home

$20 diy painted drop cloth curtains

I’m still on the journey to finishing up my son’s room. He has really been on me lately to finish his room and I totally understand, because his sister’s has been done for sometime now and he is feeling some kind of way.

Now that the walls and stripes have been painted, drapes are up next. I shared my inspiration for dropcloth curtains awhile back while I was trying to decide on a curtain option that would go with the industrial chic look that he wants.

To make sure that I would like the look initially I  purchased one dropcloth from Home Depot for $10 and used the leftover paint from his stripes. After I hung the first one, he liked it so I went back and got three more dropcloths.

Here is what you need to create these super easy no sew drop cloth curtains. This is what I used to create 4 panels

DIY no sew drop cloth curtain


Supplies

  • 4 6×9 Painters Dropcloth
  • Level
  • Painter’s Tape
  • 2 pints of paint
  • Tape Measure
  • Small paint roller and pan (my set  came from Dollar Tree)

DIY no sew drop cloth curtain


DIY no sew drop cloth curtain

Directions

  • First determine how large you want your stripe and measure using your tape.
  • Start painter’s tape at the height you desire. Use the level to make sure you keep the tape line straight as you work across the dropcloth
  • Once everything has been taped off, go back and smooth down the bottom of the tape where it meets the dropcloth to help minimize paint bleed into the areas you do not want painted
  • Now paint, give the roller a little pressure to ensure a good coat.
  • Right after you finish painting pull off the tape
  • PLEASE make sure you put something underneath as the paint will bleed through. We will be replacing the outdoor carpet in our sunroom so I didn’t care but please keep this in mind.

DIY no sew drop cloth curtain

Once you get ready to hang you can alter the length by folding the top and securing with curtain rod ring clips. I still have to adjust the lengths of the panels and steam them so this is a very preliminary look at them. I have two more panels to hang and start hanging a few of his pictures. I’ll be back with that update hopefully before the month is out.

Here’s a peek from the hallway at the before and after.

IMG_8550

IMG_8558


SNS Nails
Beauty

sns nails| the pros and cons

Self care. Much like we are embracing the word NO as being a full sentence, I’m hoping the broken record like mentions of self care in our mom spaces will eventually help us to understand that the mere level of such abilities to juggle like a million things at once will make us understand how important it is to find that one thing for ourselves and do it. Often.

This year I pondered over what would be my non negotiable when it came to self care in 2016. I don’t care for the hair salon, I love clothes but I’m not a big shopper so I pondered and pondered on that one thing that would be affordable and convenient and I came up with keeping my nails done. As a reformed nail polish hoarder, I no longer have a desire to do my own nails so I decided to sign up for bi-weekly visits to the nail salon. My sister visits Hyannis nail salon all the time and her nails always look great, so I thought I’d try it for myself.

At just a month in I am hooked. Something about looking down at my nails as I type or drive makes me happy. After having tried manicures with my real nails that barely lasted for a few days and having gel done in the past and not caring for the light used to dry them or the thickness I decided to try the SNS nails option at the recommendation of a mom at the kids school. SNS stands for Standard Nail System

Got in the nail salon and didn’t have a clue what the process looked like for SNS nails but I liked hers so decided to give it a whirl and I am hooked.

Basically SNS is supposed to be a natural and healthy alternative to gels and acrylics. It overlays over your real nails no matter how short and consists of putting a clear top coat on your nails and then dipping them in a colored powder, that process is repeated twice. Your nails are then filed and evened out before a gel coat seals in everything.

The end result lasts for two weeks with amazing shine and no lifting. Sure you could stretch to 3 weeks but how my self care regimen is set up I’m on a bi weekly schedule….for now.

I love this process so much, here is a little more on my pros and cons.

SNS Pros:

  • Two minute drying time with no light
  • End product is very thin. Feels like your real nails
  • Minimal filing down of your real nails
  • The vitamin E and calcium in the powder strengthens your real nails

    SNS Cons:

  • More expensive. Unlike gels or acrylic there is no such thing as a fill in, the color has to be soaked off every time. I pay $25 each time.
  • Takes longer than other nail options
  • It is hard to gauge how the color will turn out as it is in a powder form. You have to rely on the nail dummy instead of seeing the actual color in a nail polish bottle.

I hope you are practicing some form of self care this year. If you are not please find that thing or things to satisfy yourself.

Do you keep your nails done?

Save

Featured Living Photography

3 simple steps to organizing digital photos on your computer

Remember film, and how our parents would take photos of us and drop those little rolls off and a few days later come back with a bag full of pictures?

Those little kiosks in parking lots that were devoted solely to being the place where you would drop off and pick up your memories?

I do. My father was a photographer and film rolls in the refrigerator in those little round black containers were my reality. Fast forward lets say 30 years to be on the safe side and I can’t remember the last time I actually took the time to get my photos developed although it no longer requires me getting in my car, and  is as easy as uploading to a site and having them on my doorstep in a matter of days. We’ll take issue with that laziness later.

Today I’m sharing with you a few tips for effectively storing photos to your computer so that when it is time to look for first day of school photos, or that photo with grandma from the family reunion, within a few clicks you will know where to find those memories on your computer. It is incredible the different things you can do to your pictures with a computer, have a look at these image best practices to find out more about the things you can do to make your pictures even better.

Create a Consistent Upload Location

I’ve been guilty of uploading photos to my desktop, my external drive and to the downloads section of my computer. Do yourself a favor and pick a consistent upload location. If you do this you will automatically know where to look on your computer for your photos

Digital image storage solutions

Create a Hierarchy of Folders

Say goodbye to just uploading photos, because we are uploading now. We’re not letting photos sit on our memory cards and deleting non important ones when we need space. We’re not.

Create a hierarchy of folders starting with one renamed for the year.  This simply tells you, if you know the year the photo was taken it will be stored in that file.

From there break it down even further creating sub folders named after the month, and within those month folders create another level of sub folder renamed for any special events.  Examples would include ballet recital, 100th day of school. Get really descriptive because it is likely in a few years a vague description won’t help you out when you are looking for a photo.

Create a Backup Location

As a person whose last half of 2013 is missing thanks to a dropped external drive. Please create a back up location, and then a back up for that back up. Facebook, Instagram and other social media sites do not count. While we think these places will be around forever they may die a slow death and take your photos along with them to a digital heaven you have no access to. Myspace anyone?

There are so many options for external methods for organizing digital photos. I currently use Dropbox and an external drive, and I am thinking about adding a cloud service as well. I’m not really versed on all of the technicalities of ways to back up photos, however Lashawn at Everyday Eyecandy has some great suggestions if you are looking to learn more about methods by which to back up your photos. She totally breaks down everything. Your memories are worth preserving so I encourage you to take a peek at the options she has to offer.

These are just 3 very basic steps to get you on track to organizing your digital photos.

How are you organizing your digital photos? Are you even dowloading them out of your camera?!