Browsing Category

DIY

DIY Holidays Home

Christmas Stovetop Potpourri

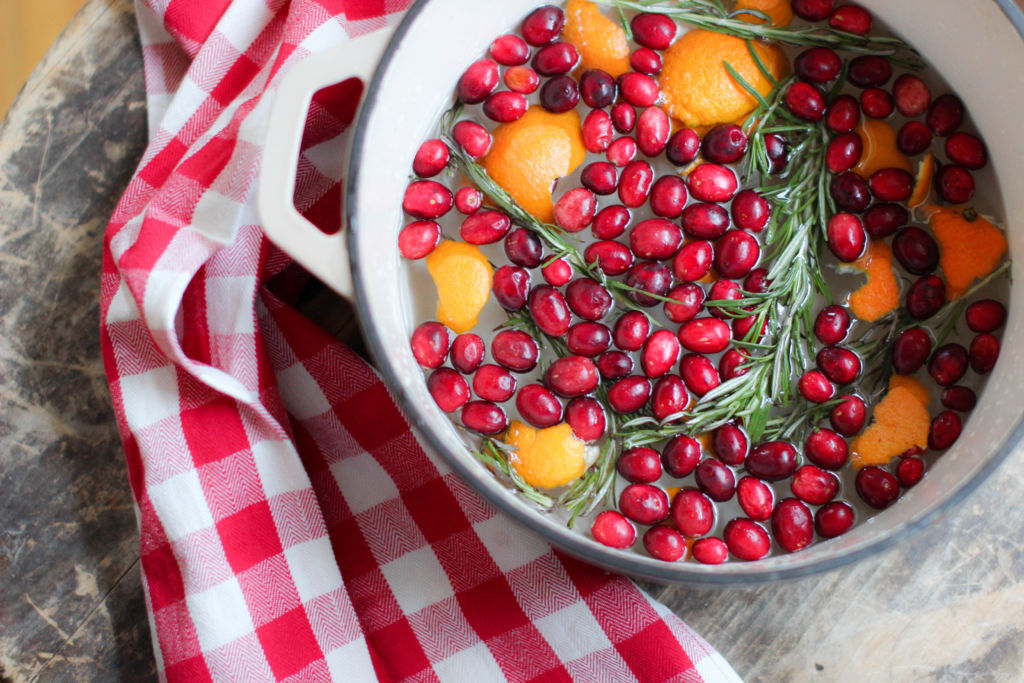
Citrus, cranberry, rosemary and cinnamon notes are perfect for the holiday season. They pair well together creating a fragrance that is a little bit sweet with a warm undertone. During this season we keep oranges in abundance for lunch and snacks, so I just recycle the peels in my potpourri.

An affordable and easy gift idea for teachers is simply gathering old organge peels along with cranberries and any other items you think would make for a great smelling potpourri, packaging them together and tying with a bow for gifting. This all natural fragrance won’t set off anyone’s allergies, and in my book qualifies as a handmade gift which in fact I happen to think are extra special.

We’ll have no problem putting together gift bags of homemade potpourri around here with all of the orange peels that we’ve accumulated.

DIY Winter Stovetop Potpourri
Ingredients
  • 6 Cuties peels
  • 2 cups of fresh cranberries
  • 3- 4 sprigs of rosemary
  • 1/2 tsp Vanilla Extract
  • 10-12 cups of water
Instructions
  1. Add water to a pot
  2. Place all ingredients in the water
  3. Bring water to a brisk boil
  4. Once water is boiling turn down to a simmer
  5. Be mindful of the water levels and refill as often as you like for continuous fragrance.

SaveSave

SaveSave

SaveSave

SaveSave

SaveSave

SaveSave

SaveSave

SaveSave

SaveSave

DIY Home

Easy DIY Christmas Wreath Tutorial

Let me just say, a good Christmas wreath is expensive. Enter this easy Christmas wreath tutorial. While I love a good traditional Christmas wreath, I like the simplicity of hoop wreaths. They are a little more modern in style, and I really like the look.

Well I took to Etsy and was floored at the pricing on some of these, and was like hold my hot glue gun…I’ll make my own.

And so I did.

These are super easy to make, and if you use a couple of coupons and pay attention to the sales this easy Christmas wreath tutorial may cost you under $20 to make.

You’ll need:

  • Floral Wire
  • Floral Sprays
  • A Metal Hoop in Your Desired Size
  • Ribbon or a Pre-Made Bow
  • Scissors or Wire-Cutters
Christmas wreath

I promise it is super simple. You basically are bending the floral spray to the shape of the hoop and securing it with floral wire, making your own bow (or adding a pre-made one) and fluffing. This short video is easy to follow along with.

While you are over there, I would love it if you subscribed to my YouTube channel and gave the video a like!

DIY Home Living

One Room Challenge Week 6 | Master Closet Reveal

We did it. In six weeks we transformed our small, non-existent closet from nothing to something. In the event you weren’t keeping up we signed up for the One Room Challenge.

If you have missed the last few weeks, let me catch you up. We participated in the one room challenge. Which is a  six week challenge where designers, and guest participants share the transformation of a room from concept to completion. It’s quite inspiring to see so many people transforming their homes during a six week period. You can follow along by going to the link above or scrolling #OneRoomChallenge on Instagram.

One Room Challenge

My last update post was on week 4. During this week we had to rip out the first cabinet that Adrian built and re-do it. For the details on why, click here.

I was a little apprehensive that he would get it completed, and there are still a few things that need to be done, like crown moulding, adding a mirror and a new door but the major things have been completed.

Here are a few photos of the transformation during week 5.

After this photo, the floor was grouted and I ended up adding some removable wall paper from Target into the nooks of the cabinet.

…and here is the final reveal

I can’t tell you how happy I am with the way this turned out. With the mishap and having to re-do the cabinet, this project still came in under $325 total. These photos do it little justice, it is a very tight space to photograph and there is no natural light so I did the best I could. We still have to put in a light, and finish the crown moulding, I’ll do an update in about a week once that is completed.

We’re hype and have now decided to attack the basement next weekend.  I think we’ve finally found our home improvement groove!

To see the before photos along with the progress of the closet during the past six weeks, here is the breakdown

Week 1 (before photos), Week 2, Week 3, Week 4.

I feel a lot of outfit of the day photos in my future! Here’s to hoping it stays clean and organized.


DIY Home

One Room Challenge Week 4 | Master Closet Makeover

Oh friends. Your eyes do not deceive you, this picture is slightly identical to last week’s but a little different. Have a seat, let me tell you what happened.

But first, if you have missed the last few weeks, let me catch you up. We are participating in the one room challenge. Which is a  six week challenge where designers, and guest participants share the transformation of a room from concept to completion. It’s quite inspiring to see so many people transforming their homes during this six week period. You can follow along by going to the link above or scrolling #OneRoomChallenge on Instagram.

One Room Challenge


You can catch up with Week 1, Week 2, and Week 3 at your leisure. Now back to “what had happened was.”

We discovered the width of the cabinet was a few inches short of a normal hanger. This meant that the clothing would hang out in the open and not be flush with the edge of the cabinet. I’m afraid this made no sense, in other words the shirt would hang past the edge of the cabinet.

We tried to come up with a solution to make it work, but the end result was ripping out the old cabinet to build a new one that was 18 inches wide to account for a hanger making everything look neat and flush. If you follow me on Instagram Stories you saw the whole saga go down. I’m too tired to create a video of my IG stories, hang tight, I’ll post it next week.

But anyway it looked a little something like this:


He was removing the trim at this point, I was low key in the corner weeping. Upside was that we were only in about $65 at this point. We are able to reuse the old sides as the top shelves so we really didn’t lose more than $15 that was spent on the MDF boards that he made the shelves out of.

If you look closely you can see the new one, on the left, is larger across allowing for more storage. More storage is always a good thing.


Might I say I’m glad we took this step back to make sure we would love the end product moving forward. He has me convinced that we will have the closet ready to reveal on November 7. I’m keeping hope alive.

Here’s our unchanged list of things that need to be done from last week:

Here’s what we need:

  • More hanging space
  • Better shoe storage
  • Shelving (built-ins, shoe shelving, high shelving for storage)
  • Grout existing flooring
  • New lighting
  • Paint (ceiling, walls, built-ins)
  • Drywall repair (ceiling, walls)
  • New hangers
  • Glass closet door
  • Baskets
  • Floor length mirror
  • Install hanging rods
  • Rug